The Create a Bear is the final Friendship Quest for Sadness in Disney Dreamlight Valley. Sadness wants to work through your emotions, so check in with her to get a fresh and clean slate. In this guide, we will walk you through the Create a Bear quest in Disney Dreamlight Valley.
How to Complete the Create a Bear Quest in Disney Dreamlight Valley
Starting the Quest
To initiate the Create a Bear quest in Disney Dreamlight Valley, players will have to reach Friendship Level 10 with Sadness and complete the Big Worry quest and the Dream a Little Dream quest for Joy. Upon fulfilling all the requirements, the Create a Bear quest will become available. Go and speak with Sadness to start the quest.
Locate three memory fragments
After speaking with Sadness to begin the quest, you need to locate three memory fragments from different locations. Here are the following locations to find all three memory fragments.
Outside somewhere you feel at home: Outside the player’s house.
A place that connects many worlds: Top floor of the Dream Castle.
Where Joy and Sadness control emotions: In the Inside Out Realm.
Rearrange the memory on the console
After picking up all three memory fragments, go to the console in the Headquarters of the Inside Out Realm. Interact with the console to place all the memory fragments. Now, interact with the switch on the right side to activate the Developer Mode. Once done, you need to use the three switches on the console to rearrange the memory. Here is the correct arrangement of the memory.
Left side: Perfect Plush Bear.
Middle: Shadowy figures picking up the plush bear.
Right side: Headless Plush Bear.
Upon rearranging the memory correctly, a lost diary page will appear on the floor. Pick up the diary page and bring it to Sadness.
Gather the materials for a New Comfort Bear
Now, gather the materials to craft a New Comfort Bear.
5x Diamond: Mine the nodes in the Forgotten Lands to find it
5x Emerald: Mine the nodes in the Forest of Valor and Glade of Trust to find it.
5x Tourmaline: Mine the nodes in the Sunlit Plateau and Frosted Heights to find it.
50x Cotton: Plant and grow Cotton using its seeds.
50x Fiber: Craft it at the crafting station using Seaweed. Alternatively, you can purchase it from Kristoff’s Stall for 6 Star Coins.
30x Dream Shard: Dig sparkling spots on the ground, remove night thorns, and feed critters their favorite food.
10x Yellow Nasturtium: Forage from the ground in the Forgotten Lands biome.
10x Purple Impatiens: Forage from the ground in the Forgotten Lands biome.
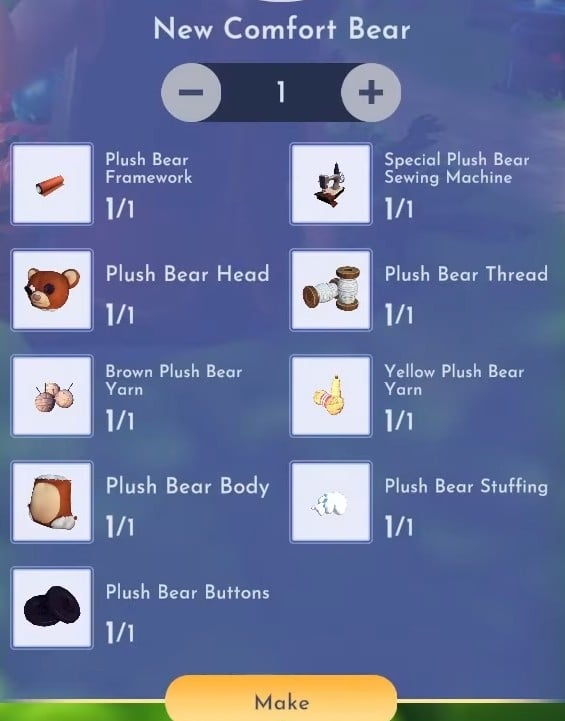
After gathering all of the materials, go to any crafting station and craft two parts of the New Comfort Bear. You need to craft a Special Plush Bear Sewing Machine and a Plush Bear Framework. Both of these recipes will be under the “Functional Items” tab. Once you have crafted the parts, it’s time to craft the actual new bear. Navigate to the Furniture tab to find the recipe for New Comfort Bear.
After crafting the New Comfort Bear, place it anywhere in the Valley. Now, go to the location of the Comfort Bear and speak with Sadness.
Add blue and yellow furniture around the New Comfort Bear
Go into the furniture mode and navigate to the Requests section to find eligible furniture items. Place any five eligible furniture items near the New Comfort Bear. Once done, speak with Joy, and she will give you some Fireworks to place near the bear. Go into the furniture mode again and place the fireworks near the Comfort Bear.
After decorating the area of the New Comfort Bear, celebrate with everybody by taking a picture. Once done, speak with Sadness and Joy. Go through the dialogues to conclude the Create a Bear quest.
Rewards
Completing the Create a Bear quest in Disney Dreamlight Valley will give the following rewards.
3,080 Friendship Points
“In Your Feelings” Overalls (outfit)
The post Create a Bear Quest Guide in Disney Dreamlight Valley appeared first on Nintendo Smash: Video Games News, Reviews & Guides.
No responses yet