The Star Named EOS is a puzzle adventure video game based around photography. This soothing adventure includes several puzzles throughout each chapter. This guide will walk you through The Star Named EOS and all its puzzles.
The Star Named EOS – Walkthrough
Upon beginning the new game, rotate to the woman on the right and interact with her. Click on the stars in the sky and you will wake up in a bedroom which begins the first chapter of the game.
Bedroom
Rotate to the left and click on the lamp. Click on the lamp again to turn it on. Click on the letter beside the lamp to find a photo inside. Click again to read the letter. Exit from the letter and click on the bookshelf. Interact with the yellow photo album and flick through the pages until you find a Torn Page.
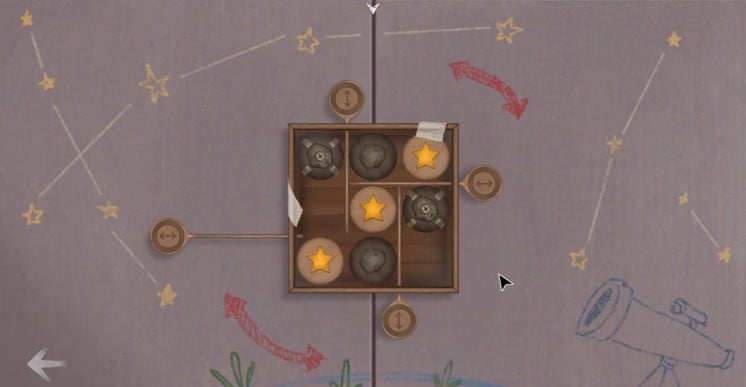
Now, click on the cabinet at the bottom of the bookshelf to solve the box puzzle. You need to rotate the box and slide the panels to move the stars and align them diagonally. Once done, the cabinet will open from where you can collect the Crank Handle.
Click on the carousel music box beside the Globe Stand at the left side of the window. Select the Crank Handle from the inventory above and place it on the side of the carousel music box. After that, interact with the crank to play the music. As the music stops., pick up the Wooden Boy Doll on the horse.
Interact with the Wooden Doll House on the table in the center of the room. Select the wooden boy doll from the inventory and place it on the button. Doing so will open a small drawer beneath the doll house from which you can pick up the Collectable Poster. Now, rotate towards the bedside again and click on the blank wall above the carousel music box. Select the poster from the inventory and place it on the wall.
After placing the poster, rotate to the desk with a Desktop Computer on the left side, and interact with the Birthday Card. Read the birthday card to learn about the gift and most importantly the date 05/24. Now, rotate further and interact with the safe below the TV. Enter the 0-5-2-4 code to unlock the safe and pick up the Camera and a Pocket Compass.
Rotate towards the window and select the camera option to take a photo of the window. It is the same photo of the window you received in the letter earlier, but it is missing some things.
Turn around and interact with the drawer at the bottom of the shelf beside the desktop. The drawer has a combination lock requiring certain icons relating to North, East, West, and South. Now, open the Pocket Compass from your inventory to see the 8-Point Star for the North direction. After that, rotate to the right and look at the poster you placed on the blank wall. It has the same star symbol.
Now, if you look at the landscape photo hanging above the bed, you will see the Diamond shape, it is the West side. Rotate further and you will see a 5-Point Star on the calendar (South), and lastly, you will see a downward triangle on the map (East). In short, put the following combination to unlock the drawer.
North – 8-Point Star
East – Downward Arrow
West – Diamond
South – 5-Point Star
Upon unlocking the drawer, pick up the curtains inside it. Now, before we decorate the window, get all of the required items first. Open the second drawer on the desktop table to find a storybook. Interact with it and slowly flick through the pages while noticing the petal motif on various pages. Eventually, you will reach a torn page so open the inventory and place the page you found earlier to fix the page.
After reading through the story, you need to enter the petal motif code in order on the box located on top of the shelf beside the desktop. Now, there will be 8 petals on the box and if you consider the top-middle one as the one, the order for the correct petal motif is 8, 3, 5, 6. Click the petals in the correct order and take the Origami Flowers.
Once done, rotate back to the window, add the curtains to the window from the inventory and then add the flowers to the vase. After that, move the vase to the right side. Lastly, take a photo of the window to move to the next chapter.
Train
Click on the envelope in the front and open the letter to receive a photo. Similar to the previous chapter, you will be recreating the received photo. Read the letter and then rotate to the right and interact with the button beside the curtains. It will turn on the light above. Now, look up and take the Metal Handle hidden in the Wall Lamp.
Rotate back down and interact with the drawer on the right side. Select the Metal Handle from the inventory and open the drawer to get the Cutlery (fork). Now, click the Puzzle Box on the table and complete the track by moving the block pieces. The trail starts from the top so focus on putting the track on the top left side first and then connecting the rest of the blocks to complete the trail.
Once done, pick up the Magnifying Glass from the box. Now, rotate to the left side and interact with the map. The map will have dark brown spots marked on it. Use the Magnifying Glass from your inventory and look at the dots from the bottom left to the top left. The order for the icons on the marked spots is as follows.
Null
Star
Box
Infinity
Rotate back and interact with the briefcase on the front seat. Enter the correct icon combination as mentioned above to open the briefcase. Pick up the Insulated Flask and the Steel Cup from the briefcase and then move the objects to the right side from the bottom to move the clothes down. Interact with the purse to reveal a Meal Ticket. Pick up the Meal Ticket and then place it on the food plate on the table. Click on the bell after placing down the meal ticket to order the food.
Pick up the Meal and then interact with the handkerchief on the table to start placing the items on the table as you saw in the photo earlier. Place the Meal on the top, Cutlery below it, Steel Cup on the left side, and fill it up by selecting the Insulated Flask from the inventory.
Lastly, take a photo of the Delicious Food on the table to move on to the next chapter.
Café
Interact with the envelope on the table to see the photo you need to recreate for this chapter and read the letter. Once done, eat the food and drink the coffee on the table. The plate will reveal a Snake symbol with ‘1000’ written beneath it. Remember the symbol and the number as you are going to need it later.
Rotate to the right side and interact with the pendant placed on the windowsill. The pendant will have a rotatable rose on it with three rings. You need to rotate all three rings to line up the rose and open the pendant. Look at the edges of the pendant to line up the shapes with the outer ring, and then work your way to the middle to complete the rose.
Once done, pick up the Pressed Flowers from inside the pendant. Now, rotate back to the table and search the pockets of the coat on the chair to find a Needle. Place the needle inside the clock on the table. Look at the signboard outside the window and it will reveal that the van isn’t available from 4:45 to 5. Interact with the clock and move the needle to forward the time in-between 4:45 to 5.
Doing so will move the van and you will see two posters, one where you have to recreate the photo, and the other one reveals the ‘72’ number with the Rome poster. Now, rotate back and look at the photo of the Knight on a horse. It reveals the ‘1011’ number. After that, interact with the Red Box on the table to see three symbols that you need to convert to numbers to figure out the correct combination code.
The symbols marked on the box are “Knight on a Horse + Snake – Rome”, and if we calculate it comes out as: “1011+1000-72 = 1939”. Enter 1939 as the combination code on the red box to open it and pick up the Scissors inside it. After that, rotate a bit down to see a flyer. Cut the flyer using the scissors to get a cutout of a tent.
Now, rotate to the window again, and place the tent and the Pressed Flowers on the poster in front. Once done, take a picture of it to move on to the next chapter.
Campsite
Interact with the envelope on the chair to find a torn letter. Rotate to the left side and interact with the bottle to find a note with some clues. Interact with the fishing rod on the boat and start reeling in the line to catch a boot. Click on the boot to drop it into the water again and then interact with the Fishing Hook to take it.
Turn around and interact with the BBQ Grill to see a key inside the grill. Use the Fishing Hook from the inventory and then trace the strip along the correct path to safely recover the Key. Rotate to the right side to see a Red Toolbox. Interact with it and use the Key to open it. Pick up the Shovel from the toolbox.
Turn around and interact with the book on the table to see the pattern for making a knot with a rope. Flick on the next page to see the order of the plates and a cup. Remember the order and then turn around again. Interact with the basket to see plates and a cup. Move the cup and the plates around to clear out the 1st spot to reveal the letter fragment.
Now, turn around again and look at the side of the tent and the guitar to see the icons of a sun and a star while the moon shining above in the sky. It is reminiscent of the clue you found in the bottle. Equip the camera and take a picture to reveal something on the ground. Interact with the revealed item and then use the shovel to dig it. Pick up the second letter fragment.
Interact with the wooden chest in front of the tent and move the sliders in the following order to open it.
Middle
Up
Up
Middle
Down
Pick up the Rope inside the chest. Rotate towards the campfire and interact with the hammock on the tree. Use the rope on the hammock and you will get to tie a knot. After that, pick up the third letter fragment from the ground.
Now, interact with the letter again and add the rest of the fragments to combine them to complete the letter. A storm will appear out of nowhere. Pick up a Photo Fragment from the ground and then rotate to see a cabin in the distance. Take a photo of the cabin to move on to the next chapter.
Abandoned Bedroom
Interact with the book on the floor. Turn the pages to see three blank spaces for the photographs. Place the photographs according to your journey in the blank spaces and turn the pages again to find a Stained Paper Fragment. After that, interact with the safe and press the blocks shown in the image below to open it.
NOTE: The pattern for the square buttons is imprinted on the boxes in the room.
After opening the safe, pick up another Stained Paper Fragment from inside it. This new fragment will reveal a radio frequency, ‘FM 104.9’. Interact with the radio beside the lamp and place the Pocket Compass onto the slot in the radio. Rotate it to bring the South direction upwards and then rotate the knob on the side to tune the radio to FM 104.9.
The radio will start playing a Morse code in an order and to identify the meaning of the Morse code, look at the Morse code cheat sheet beside the radio. It will play morse codes for five different symbols as follows.
1: Sun (. . .)
2: Camera (– . – )
3: Cloud (. . – )
4: Star (. – .)
5: Fire (– – –)
After realizing the morse codes, open the left drawer on the desk, and interact with the box inside it. Enter the corresponding shapes of the Morse code in order to open the box and pick up the Small Knife and another Stained Paper Fragment. Now, place the stained paper fragments together to reveal a combination code as “2365”.
Use the Small Knife on the torn wall above the bed to reveal a hidden safe. Use the 2365 code to open the safe. You will teleport back to the Train where you will find a Torn Photo on the floor of the train. Pick up the photo fragment and interact with the woman who appears to teleport to the Cafe. Rotate around to pick up the Torn Photo from the floor of the cafe. Interact with the woman again to teleport to the Campsite.
Rotate around the campsite to find the final torn photo fragment and then piece together the photo. A brief cutscene will play and after that, you will come back to the abandoned bedroom. Move the hat and the mug in the safe to interact with another journal book. Turn the pages to find a new highlighted radio frequency, ‘AM684’.
Interact with the radio again and tune it to AM684 by placing and rotating the compass. Listen to the Morse codes again and see the cheat sheet to figure out the symbols. The Radio will play the following morse codes of the following symbols.
1: Sun (. . .) (sun)
2: Camera (– . –)
3: Moon (– . .)
4: Star (. – .)
5: Star (. – .)
Now, interact with the box again in the drawer and put in the correct order of the symbols to unlock the box. It will reveal a strange item. Go back to the radio and remove the compass. Place the compass on top of the revealed item in the box and then place the needle on top of it from the inventory.
Pick up the compass and follow the needle in the North direction to reveal a hidden door. Go into the revealed room and place all the items onto the tripod as shown on the image behind the tripod. After that, rotate the camera to the cabinet and it will make a trail on it. Take the picture and then interact with the appeared cabinet.
Interact with the mechanism inside the cabinet and place the compass in the middle. Now, rotate the outer circle to May and the inner circle to 24 (Dei’s Birthday). Open the camera and rotate it to the lower legs of the bed. It will reveal a new cabinet by taking its photo. Open the cabinet and take a torn photo fragment. Now, interact with the mechanism again and rotate the outer circle to August and the inner circle to 12 (Six Months after the 2/12 camping date).
Open the camera and rotate it to the shelf on the right side of the window to reveal a new cabinet. Take a photo and interact with the cabinet to find another torn photo fragment. After that, piece together the torn photo fragments. Once the photo has been fixed, rotate it to reveal a new date (9/5).
Now, interact with the mechanism again and rotate the outer circle to September and the inner circle to 5. Open the camera and look to the right side of the cabinet to see the stars align as one. Take a picture of the appearing star to move on to the next chapter.
Forest
As you appear in the forest, turn around to talk to the woman. Choose the dialogue on the screen to pursue the conversation. Rotate to the right side and select the path ahead to follow the woman. Look above the sky to see a shining star and then choose the path below the star to continue ahead. Keep on repeating the process of choosing the path under the bright star until you reach an open field.
Now, look up in the sky and start clicking on the bright stars until they form a complete image. Once the image is complete, interact with the woman to accept the gift of a compass, and you will move on to the final chapter.
Modern Bedroom
Interact with the book on the bed and turn the pages to find the blank space for a photograph. Place the photograph in the space from the inventory. Now, interact with the window to teleport to a modern train. Take a photo of the train window and then take a few random photos. Once the woman says, “Look, we’re almost there!”, take a picture of the door in the train cabin.
The door will open, interact with it to teleport to the cafe. Listen to the dialogues and when the woman says, keep on taking photos, take a random photo every time she stops speaking to continue ahead. Repeat the process until she says, “It’s getting late, we should get going.”, interact with the cafe’s door to teleport to the campsite.
Take three random photos in the campsite and then interact with the woman when she calls Dei. Take a couple of more photos and interact with the grave of Dei’s mother to conclude the final chapter.
Congratulations, you have completed The Star Named EOS.
The post The Star Named EOS: Complete Game Walkthrough appeared first on Nintendo Smash: Video Games News, Reviews & Guides.
No responses yet